5. Install Linux and LILO on DiskOnChip
In this section we will learn how to install Linux operating system on an unformatted DOC and boot from it using LILO as the boot loader.
In order to get to this state, a procedure will be discussed. Some steps in this procedure resemble the steps discussed previously in this document. Even so, this should be considered a separate procedure, rather than a continuation of the steps in Section 4.
In general, to make a device to boot into Linux, it should have the following components:
Kernel Image
Root Filesystem
Boot loader to load the kernel Image into memory
This section will basically try to fulfill the above three requirements.
The following steps should be followed for achieving the goal of this section.
5.1. Step 1: Copying the DOC firmware onto DiskOnChip
We will use the dformat utility from linux_binary.5_1_4/dformat_5_1_4_37.
M-Systems does not provide the firmware for using the DOC on Linux platforms. We address this problem by making a copy of the firmware shipped with the M-Systems dos utilities into this directory ("dos utilities" is the term used by the M-Systems people so we have also used this name). On our system we copied it by mounting the windows partition and extracting it from there:
mount -t auto/dev/hda5 /mnt/d
cp /mnt/d/dos\ utilities/doc514.exb linux_binary.5_1_4/dformat_5_1_4_37/
Now format the drive, using the dtformat from linux_binary.5_1_4/dformat_5_1_4_37/:
cd linux_binary.5_1_4/dformat_5_1_4_37/
./dformat -WIN:D000 -S:doc514.exb
D000 specifies the address of the DiskOnChip in the BIOS.
The following is the BIOS (RTD Enhanced Phoenix - AwardBIOS CMOS Setup Utility (v6.00.04.1601)) setting on our system.
The Integrated peripherals of the BIOS menu should have:
SSD Socket #1 to Bios Extension Bios Ext. Window size 8k Bios Ext. window [D000:0000] Fail safe Boot ROM [Disabled] |
The Bios Ext. Window denotes the address for your DiskOnChip.
 | BIOSes |
|---|---|
The setting may be different depending upon your BIOS version. |
Now shutdown the system and boot into Windows XP.
From now on you will notice the TrueFFS message and some time delay before the Grub Menu appears.
5.2. Step 2: Format DiskOnChip using Dos Utilities
Boot into Windows XP. We will use the M-Systems Dos Utilities for formatting the DiskOnChip. The Dos utility dformat will copy the firmware to the DOC, and then format it as a fat16 device.
Using the command prompt, run the following command from the DOS utilities folder (assuming that you have already downloaded the DOS utilities):
dformat /WIN:D000 /S:doc514.exb
Check the DOC partition using another utility called dinfo. A sample dinfo output is given in the appendix.
Again shutdown the system and now boot into Linux.
| Always shutdown |
|---|---|
After formatting you should always do a full shutdown (power off) and not just a reboot. |
Even though Step 1 and Step 2 seem to be the same, the only difference being that Step 1 is done from Linux and Step 2 from Windows XP, they both have to be done.
5.3. Step 3: Patch and Compile the kernel 2.4.18
This has to be performed in exactly the same manner as described in Section 4.1 and Section 4.2.
Also add an entry for the new kernel in /boot/grub/menu.lst as described in Section 4.4.
5.4. Step 4: Create nodes
This is done using the ame procedure as described in Section 4.3.
5.5. Step 5: Modify the /etc/module.conf file
The file /etc/modules.conf has to be modified, adding this line at the end of the file:
options doc major=62 |
This is required since our nodes use a major number of 62, while the doc driver module uses a major number of 100. When creating the initrd image, the driver will be loaded with major number value of 100 (instead of 62) if you do not edit the module configuration file. This will make it impossible for the nodes to use the driver. The reason for using the initrd image will be explained in the next step.
The mkinitrd_doc script from linux_binary.5_1_4/doc-linux-5_1_4_20/driver reads the /etc/modules.conf file and looks for anything that has been mentioned for the DOC driver regarding the major number. By default, mkinitrd_doc will create an initrd image that loads the DOC module with a major number of 100. However, with the modifications we have made to the /etc/modules.conf file, the initrd image will load the module with a major number of 62.
5.6. Step 6: Create the initrd image
Run the mkinitrd_doc script from linux_binary.5_1_4/doc-linux-5_1_4_20/driver/:
./mkinitrd_doc
This may give warning messages similar to the following, which can be safely ignored:
cp: cannot stat ./sbin/insmod.static.: No such file or directory cp: cannot stat ./dev/systty.: No such file or directory |
Check for the newly created initrd image, initrd-2.4.18.img, in the /boot directory.
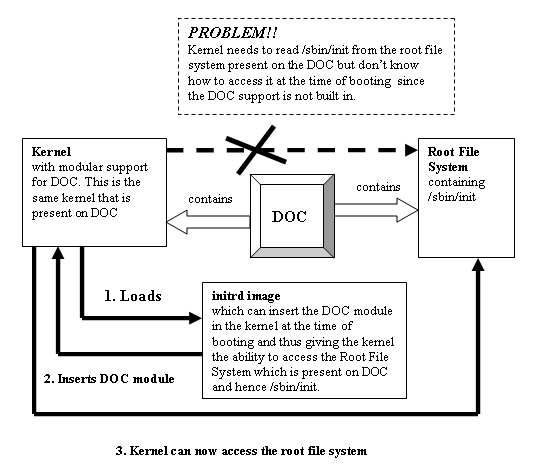
Running the mkinitrd_doc script produces this image. The reason for making an initrd image is that the provided M-Systems driver cannot be added as a built-in support in the kernel, which leaves no other option than adding it as a loadable module. If we want to boot from DOC, the kernel should know how to access the DOC at the time of booting to search for /sbin/init in the root filesystem on the DOC (the root filesystem is necessary to get the Linux system up).
In the booting sequence of the Linux, /sbin/init is the file (a command actually) that the kernel looks for in order to start various services and, finally, give the login shell to the user. The figure below illustrates the problem:
5.7. Step 7: Insert the DOC driver into the new kernel
Reboot the system and boot into the newly created kernel.
Now insert the doc module:
modprobe doc
This will give the following messages:
fl : Flash disk driver for DiskOnChip fl: DOC devices(s) found: 1 fl: _init:registed device at major 62 . . . . |
To access the DOC, ensure that the major number assigned to the nodes is 62.
In case of a major number of 100 is assigned, check if the /etc/modules.conf was successfully modified. If it was not, then repeat Section 5.5. You must then also repeat Section 5.6 because the initrd image depends on /etc/modules.conf. If the DOC entry were incorrect in this file, the initrd image will be useless.
5.8. Step 8: Create a filesystem on the DiskOnChip
Perform Section 4.6. This is required to create partitions on the DOC.
5.9. Step 9: Build Root Filesystem on the DiskOnChip
Before starting with this step make sure that you have not mounted /dev/msys/fla1 on any of the mount points, as this step will involve reformatting the DiskOnChip.
Also, in order to understand the details of Root File system refer to The Linux Bootdisk How To available at http://www.tldp.org.
We will use the mkdocimg script located in linux_binary.5_1_4/doc-linux-5_1_4_20/build.
We will also use the redhat-7.1.files directory, located in the same directory (i.e. build), which contains the list of the files that will be copied in the root filesystem that will be created on the DOC.
./mkdocimg redhat-7.1.files
This step will take a few minutes to complete.
Now mount the /dev/msys/fla1 partition on the mount point /mnt/doc and check the files that have been created:
mount -t auto /dev/msys/fla1 /mnt/doc
cd /mnt/doc
The following directories are created on the DOC as a result of running the script:
bin dev sbin etc lib usr home mnt tmp var boot
The most important is the boot directory. This contains the vmlinuz-2.4.18 and initrd-2.4.18.img which gets copied from the /boot directory. This directory is required when booting from DiskOnChip.
Apart from these files there are some other files which must be deleted:
System.map-2.4.18
boot.3E00
These two files are created later by LILO.
The redhat-7.1.files directory contains a list of files and directories that will be created when we use the mkdocimg script.
This script does not create all the files that are necessary for creating the root filesystem on the DOC. So replace the directories created by the mkdocimg script, with the directories of the / filesystem (root filesystem that is currently running).
The directories under /, such as etc, sbin, bin and so on contain lot of files that are not useful and ideally should not be copied while building the root filesystem for DOC. But since we have not discussed the files that are essential and the files that can be removed, we therefore suggest that one should copy the entire contents of the directories. We know that it is a clumsy way of building the root filesystem and will unnecessarily take lot of memory; bear with us as in the next section we will explain how to put the development tools on the DOC. We will then remove the useless files from the root filesystem of DOC.
If you are aware of how to build the root filesystem we would encourage you to copy only the essential files.
The following is the set of commands we used to modify the root filesystem:
rm -rf /mnt/doc/sbin
rm -rf /mnt/doc/etc
rm -rf /mnt/doc/lib
rm -rf /mnt/doc/dev
cp -rf /sbin /mnt/doc
cp -rf /etc /mnt/doc
cp -rf /dev /mnt/doc
cp -rf /lib /mnt/doc
rm -rf /mnt/doc/lib/modules
Now our filesystem is ready.
The total size occupied by this filesystem will be about 35Mb.
5.10. Step 10: Use rdev to specify the DOC root filesystem location to kernel image
This step is required to specify the location of the DOC root filesystem to the kernel we compiled in the step 3. The step can be avoided by giving the details of the root filesystem location in the Boot Loader configuration file, but we had some problems in making the kernel locate the root filesystem at the time of booting so we recommend executing this command:
rdev /boot/vmlinuz-2.4.18 /dev/msys/fla1
5.11. Step 11: Compile lilo-22.3.2
We are going to use LILO as the boot loader since this is the only BootLoader that can read an INFTL device without many changes to be done to the BootLoader source code.
For more information on how LILO and other boot loaders operate, refer to .
We need to compile the lilo-22-3.2 source code to get the executable file for LILO.
We will use the source code from linux_binary.5_1_4/doc-linux-5_1_4_20/lilo/lilo-22.3.2.
Before starting the build we need to do the following:
Create a soft link for the kernel-2.4.18 source code with the name linux.
When you untar the file linux-2.4.18.tar.gz it will create a directory linux. So we need to rename the directory linux to linux-2.4.18 before creating a soft link with the same name:
mv linux linux-2.4.18
ln -s linux-2.4.18 linux
If the above steps are not done the build might fail.
Patch file: linux_binary.5_1_4/doc-linux-5_1_4_20/lilo/lilo-22.3.2/common.h:
The lilo-22.3.2 source code that comes with the M-Systems linux_binary.5_1_4.tgz is buggy as one of the variables PAGE_SIZE is not defined. We need to patch the LILO source code as follows:
Add the following lines in the common.h after the line "#include .lilo.h.":
+ #ifndef PAGE_SIZE
+ #define PAGE_SIZE 4096U
+ #endif
#define 0_NACCESS 3
Where "+" indicates the lines to be added.
Make sure that the gcc version is 2.95.3 by using gcc --version.
Now we can start the build process. Run
make clean && make
This will create a new LILO executable, linux_binary.5_1_4/doc-linux-5_1_4_20/lilo/lilo-22.3.2/lilo. Copy this LILO executable into /sbin/lilo and /mnt/doc/sbin/lilo:
cp linux_binary.5_1_4/doc-linux-5_1_4_20/lilo/lilo-22.3.2/lilo /sbin/lilo
cp linux_binary.5_1_4/doc-linux-5_1_4_20/lilo/lilo-22.3.2/lilo /mnt/doc/sbin/lilo
5.12. Step 12: Copy the boot.b file into boot directory of DOC
We need to copy the file boot.b from linux_binary.5_1_4/doc-linux-5_1_4_20/lilo/ to /mnt/doc/boot.
The file contains the essential stage1 and stage2 of the LILO boot loader.
5.13. Step 13: Modify the /etc/lilo.conf file
First, remove the existing /etc/lilo.conf:
rm -rf /etc/lilo.conf
Now create a new /etc/lilo.conf, using a text editor, and add the following lines to it:
boot=/dev/msys/fla compact install=/boot/boot.b map=/boot/System.map disk=/dev/msys/fla bios=0x80 prompt delay=50 timeout=50 image=/boot/vmlinuz label=linux root=/dev/msys/fla1 initrd=/boot/initrd.img read-only |
According to the above lines added to /etc/lilo.conf, one needs to create soft links for vmlinuz-2.4.18 and initrd-2.4.18.img in /mnt/doc/boot:
cd /mnt/doc/boot
ln -s vmlinuz-2.4.18 vmlinuz
ln -s initrd-2.4.18.img initrd.img
Copy the newly created /etc/lilo.conf to mnt/doc/etc/lilo.conf.
5.14. Step 14: Store the new LILO configuration on the DiskOnChip
This step will configure LILO in the MBR of the DiskOnChip and hence make the DiskOnChip bootable.
Ensure that /dev/msys/fla1 (root filesystem partition for the DOC) is mounted on the mount point /mnt/doc.
Execute the following command to store the LILO configuration on the DOC:
lilo-v -C /etc/lilo.conf -r /mnt/doc
/mnt/doc denotes the location where the BootLoader will be installed, so it is installed on the DiskOnChip, as /mnt/doc is the mount point for the primary partition of DOC where LILO was configured.
It will create the following two files in the boot directory of DOC (i.e. /mnt/doc/boot):
System.map-2.4.18
boot.3E00
Now you should make a backup of the entire DiskOnChip to allow for easy restore of the files damaged by possible fatal errors:
cd /home
tar -cvzf docimg.tgz /mnt/doc
This will create a compressed copy of all the contents of DiskOnChip with the name docimg.tgz in /home.
5.15. Step 15: Modify etc/fstab of DiskOnChip root file system
Open the /mnt/doc/etc/fstab file and edit the line where the mount point is /. Change that line to:
/dev/msys/fla1 / ext2 rw.noauto 0 1 |
5.16. Step16: Update Firmware
This step is required to update the firmware of the DiskOnChip. We will use the dformat utility from linux_binary.5_1_4/dformat_5_1_4_37:
./dformat -W:D000 -S:doc514.exb -Y -NOFORMAT
 | Don't format! |
|---|---|
The NOFORMAT flag is important otherwise it will reformat the DiskOnChip device, and the contents will be lost. |
The above command will cause the DiskOnChip to boot in the absence of any other bootable device. So we need to remove the Hard Disk in order to allow the DOC to boot.
5.17. Step17: BOOT from DiskOnChip
Check your BIOS manual for enabling booting from a BIOS extension device i.e. DiskOnChip. On our system we had to disable the Hard Disk and CDROM and set the first bootable device as HDD-0.
Reboot the system after making the necessary changes in the BIOS.
You will get the LILO menu and on pressing enter Linux gets booted from DiskOnChip.